A cool music class led by Mr Jas Ingram, AKA CaptainUkeHandles, and his mate Steve. During the session, the 2 musicians perform guitar, ukulele and... the snoot flute! Great job, guys! Don't miss the second part featuring a musical saw.

Nov 16, 2012
Historic Nose Flutes - Couchois' Whistle: Building
Some historic nose flutes have totally disappear or haven't even been produced or commercialized. Our goal, here, is to reconstruct them, as close as possible to the original, with the help of the patent drawings and descriptions.
[Sequel of the post Couchois' Whistle: drawing a template]
Again, I used repositionable glue to fix the template on a sheet of 0.5 mm tin plate, then cut the pieces and drilled the holes. However, I kept one of the airway side uncompletely cut, in order to have it staying stable (not deformed) for the soldering.

Then, I began the soldering. First the airway.
Next, folding the nose shield around a 11 mm diameter tube (a pen) in order to form approximately a 90° angle. Then, soldering it to the airway.


Now, making the 23 mm diameter tube. I could have looked for metal tube of the right diameter, like a broom handle for instance. But it would have been made in another type of metal, and certainly would not have had the same thinness that my plate. So I made it by myself, rounding the rectangle around the cap of a plastic cap, and finishing the circle with small flat pliers. Finally I soldered it.
I filed the labium...

.. and soldered the disk to the mouth tube:

Last but not least, I made the most difficult soldering to comple the flute:


The Couchois' replica is not completed yet: I want to electroplate it!
Go to next part
---
On the same topic :
- Historic Nose Flutes - The Nasalette: Template
- Historic Nose Flutes - The Nasalette: Building
- Historic Nose Flutes - The Nasalette: Review
- Historic Nose Flutes - Couchois' Whistle: Template
- Historic Nose Flutes - Couchois' Whistle: Building
- Historic Nose Flutes - Couchois' Whistle: Review
- Historic Nose Flutes - Grierson's Whistle: Template
- Historic Nose Flutes - Grierson's Whistle: Building
- Historic Nose Flutes - Grierson's Whistle: Review
---
[Sequel of the post Couchois' Whistle: drawing a template]
Again, I used repositionable glue to fix the template on a sheet of 0.5 mm tin plate, then cut the pieces and drilled the holes. However, I kept one of the airway side uncompletely cut, in order to have it staying stable (not deformed) for the soldering.
 |  |

Then, I began the soldering. First the airway.
 |  |
 |  |


Now, making the 23 mm diameter tube. I could have looked for metal tube of the right diameter, like a broom handle for instance. But it would have been made in another type of metal, and certainly would not have had the same thinness that my plate. So I made it by myself, rounding the rectangle around the cap of a plastic cap, and finishing the circle with small flat pliers. Finally I soldered it.
 |  |
 |  |

.. and soldered the disk to the mouth tube:

Last but not least, I made the most difficult soldering to comple the flute:
 |  |


The Couchois' replica is not completed yet: I want to electroplate it!
Go to next part
---
On the same topic :
- Historic Nose Flutes - The Nasalette: Template
- Historic Nose Flutes - The Nasalette: Building
- Historic Nose Flutes - The Nasalette: Review
- Historic Nose Flutes - Couchois' Whistle: Template
- Historic Nose Flutes - Couchois' Whistle: Building
- Historic Nose Flutes - Couchois' Whistle: Review
- Historic Nose Flutes - Grierson's Whistle: Template
- Historic Nose Flutes - Grierson's Whistle: Building
- Historic Nose Flutes - Grierson's Whistle: Review
---
Nov 15, 2012
Joyful video review from Japan
Funny video of a japanese man, iizka3, discovering the nose flute and saying to be hooked by his new Bocarina™.
Nov 14, 2012
Historic Nose Flutes - Couchois' Whistle: Template
Some historic nose flutes have totally disappeared or haven't even been produced or commercialized. Our goal, here, is to reconstruct them, as close as possible to the original, with the help of the patent drawings and descriptions.
Couchois' Whistle: Drawing a template
Oct. 21, 1899, Garrett John Couchois filed a Design patent for a "Whistle". The very elegant shape is registered one monyh later, on 21st of November. Indeed, it is a nose flute, based on the same principle that the Nasalette, but with some improvements: the mouth tube has become circular, which is more ergonomic than a rectangular section, and the nose hood has been replaced by a simple nose shield.

Before building a template for the replica, I analysed the drawings and, as with the Nasalette patent, found some inconsistencies in the design:
- A. The base of the airway does not correspond on side and front views. Indeed, the mouth hole looks very high on the front view.
- B. The largest part of the nose shield is not as the same height on both views.
- C. The nose shield width does not match on front and top views.

However, these are not "fatal errors" and it is easy to correct them to reach a certain consistency.
Next step was to define the dimensions. I measured the distance between the middle of my open mouth and my nostrils, and was able to evaluate the total height of the Couchois' whistle to 7 cm. Then, it was easy to deduce the other dimensions.
On the original front view, the mouth hole was really too tall, so I chose to used its dimensions on the side view, and I corrected the other mistakes.

Then, as I did for the Nasalette, I designed many templates on cardboard until I reached the perfect one (the nose shield looks different on the first picture, but it is just a matter of folding and view angle). And the cardboard model worked as an instrument!


And I was then able to draw the template:

You can download the PDF full size template here.
To be continued!
---
On the same topic :
- Historic Nose Flutes - The Nasalette: Template
- Historic Nose Flutes - The Nasalette: Building
- Historic Nose Flutes - The Nasalette: Review
- Historic Nose Flutes - Couchois' Whistle: Template
- Historic Nose Flutes - Couchois' Whistle: Building
- Historic Nose Flutes - Couchois' Whistle: Review
- Historic Nose Flutes - Grierson's Whistle: Template
- Historic Nose Flutes - Grierson's Whistle: Building
- Historic Nose Flutes - Grierson's Whistle: Review
---
Couchois' Whistle: Drawing a template
Oct. 21, 1899, Garrett John Couchois filed a Design patent for a "Whistle". The very elegant shape is registered one monyh later, on 21st of November. Indeed, it is a nose flute, based on the same principle that the Nasalette, but with some improvements: the mouth tube has become circular, which is more ergonomic than a rectangular section, and the nose hood has been replaced by a simple nose shield.

Before building a template for the replica, I analysed the drawings and, as with the Nasalette patent, found some inconsistencies in the design:
- A. The base of the airway does not correspond on side and front views. Indeed, the mouth hole looks very high on the front view.
- B. The largest part of the nose shield is not as the same height on both views.
- C. The nose shield width does not match on front and top views.

However, these are not "fatal errors" and it is easy to correct them to reach a certain consistency.
Next step was to define the dimensions. I measured the distance between the middle of my open mouth and my nostrils, and was able to evaluate the total height of the Couchois' whistle to 7 cm. Then, it was easy to deduce the other dimensions.
On the original front view, the mouth hole was really too tall, so I chose to used its dimensions on the side view, and I corrected the other mistakes.

Then, as I did for the Nasalette, I designed many templates on cardboard until I reached the perfect one (the nose shield looks different on the first picture, but it is just a matter of folding and view angle). And the cardboard model worked as an instrument!
 |  |


And I was then able to draw the template:

You can download the PDF full size template here.
To be continued!
---
On the same topic :
- Historic Nose Flutes - The Nasalette: Template
- Historic Nose Flutes - The Nasalette: Building
- Historic Nose Flutes - The Nasalette: Review
- Historic Nose Flutes - Couchois' Whistle: Template
- Historic Nose Flutes - Couchois' Whistle: Building
- Historic Nose Flutes - Couchois' Whistle: Review
- Historic Nose Flutes - Grierson's Whistle: Template
- Historic Nose Flutes - Grierson's Whistle: Building
- Historic Nose Flutes - Grierson's Whistle: Review
---
Nov 13, 2012
Japanese « beginner' nose flute »
Some 9 months ago, we were wondering (in this post) if a japanese new plastic nose flute was somehow on the bench. We had found its pictures on Mr. katada's blog.
There is new info about this product, which is apparently produced on a regular basis now. On his Facebook page, Mr. Mosurin just displayed a picture of those plastic hanabue, and confirmed they are a beginner model, with dimensions especially adapted to women and children physiognomy. Sensei Mosurin uses them in schools to teach the art of the nose flute playing. We are impatient to try them.

There is new info about this product, which is apparently produced on a regular basis now. On his Facebook page, Mr. Mosurin just displayed a picture of those plastic hanabue, and confirmed they are a beginner model, with dimensions especially adapted to women and children physiognomy. Sensei Mosurin uses them in schools to teach the art of the nose flute playing. We are impatient to try them.

Nov 12, 2012
Mr. Makoto, finally.
It's been several months that I'm following the videos by Mr. Makoto Ikushima (誠 生島). This japanese man from Shinjuku-ku, Tokyo, plays the nose flute and makes nose flute videos. But, he never showed himself in them, and that was the reason I hadn't yet published one of them on this blog.
But 3 weeks ago, Mr. Makoto published a video in which he sings a japanese song.
And yesterday, a nose flute video made in the Toyoma Park, in which he finally appears while playing his hanabue. Thanks to him!
But 3 weeks ago, Mr. Makoto published a video in which he sings a japanese song.
And yesterday, a nose flute video made in the Toyoma Park, in which he finally appears while playing his hanabue. Thanks to him!
Nickel electroplating restoration
When we think of a metal Humanatone, for instance, we have an inner sight more or less like that...

... which is a wrong and dull representation. Indeed, in the 1900's, the nose flutes were not oxydized, and even more, whether some were painted, some were nickel or chrome plated. Ditto for the german and british metal ones.


Some of these antique nose flutes still show traces of that plating:

I decided to restore/protect one of my german metal Nasenflöten from rust, the one in the worst shape, very rusty. The goal was not to get a mint nose flute, as if it was brand new: it would be impossible with this technique, since the coat of new metal will be very thin, and all the tin already digested by the rust would not rebuild, for sure. I thought it would be stupid to plate a coat of chrome, since it is so shiny that it would not fit with the damaged flute. With a nickel plating, it would be less shiny, a bit renewed, and protected from rust for years. That would be enough.
First, I removed all the existing rust, by dipping the instrument into a dedicated "rust removal" product (I used "Rustyco").

Then I sanded the flute with very fine steel wool and cleaned it very carefully of any possible remaining "finger grease".
The nickel plating was (and still is) made by electrolysis (electroplating), and is rather easy to do at home. The only precaution is to perfom it outside, not to breathe the gazes. On that purpose, we need one piece of nickel, to be used as an anod, and a nickel sulfate bath (NiSO4 dissolved in water). Plus some usual accessories: a pot, some wire, batteries...
Nickel sulfate:

In my case, I used an already made NiSO4 solution, found in a electronic shop, used for... nickel plating. Warning: if you do it, be sure not to ingest this poison, and avoid to touch it (nickel sulfate is cancerogen by ingestion, but not explosive nor inflamable). The best is to manipulate it outside, with gloves. I also bought a nickel anod, but I could have used any pure nickel item (a real nickel coin, for instance):

First, I build my generator, with 4 regular LR20 batteries, linking in series 2 pairs of them, each pair being connected in parallel. So, I kept a low voltage (2x1.5 V), but doubled the intensity:

I ended the wires with crocodile clips (on the pic, one is covered to avoid contact with the other):

So, I placed the anod in the liquid, used the nose flute as the cathod, and connected them to the batteries.

I first made a test with a copper coin, and a light plating was visible after 30 seconds:

The plating work is much quicker while the piece to be plated is small and the electrolyte is warm. But my nose flute is a rather large piece, I want to work outside (not to inhale gazes) and the weather is very cold. So, my electroplating session will last long. I also will have to change the flute position, and also the crocodile clip location.

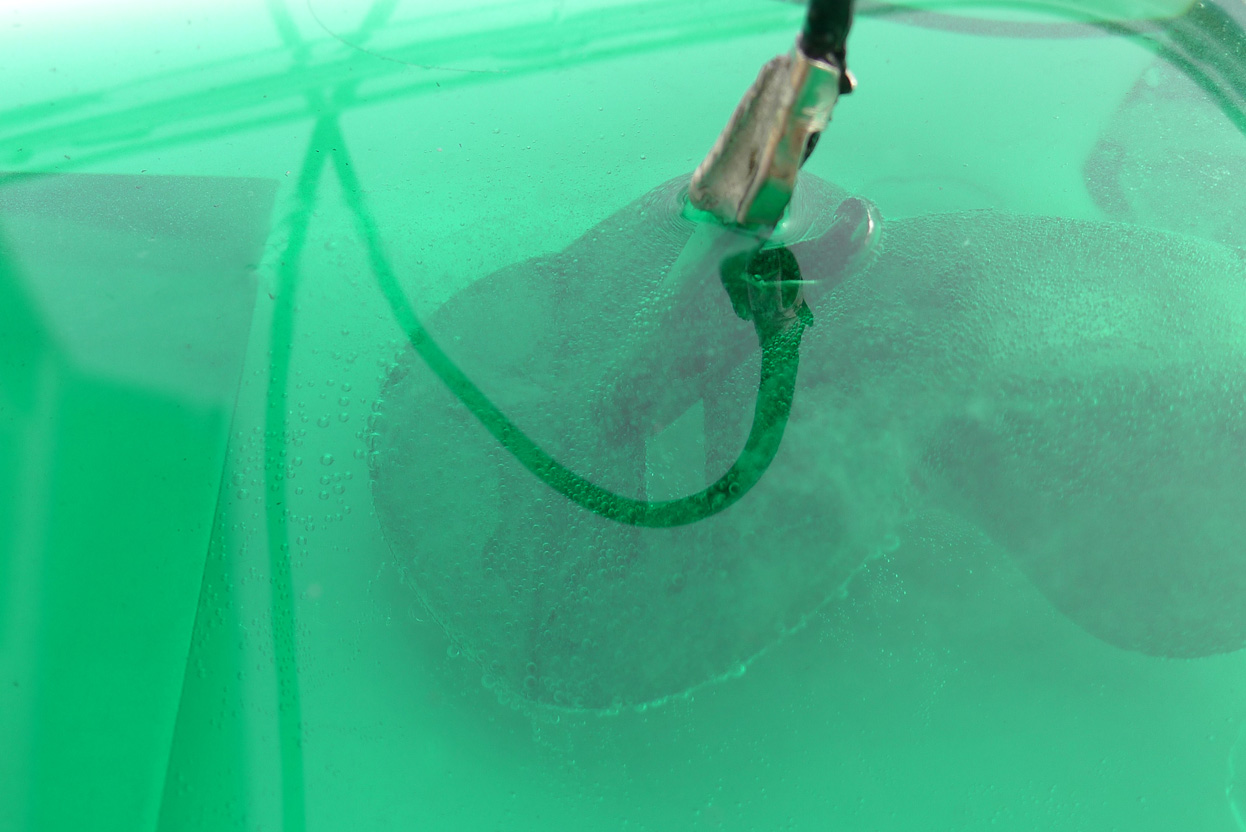
Immediately, many small bubbles surround the nose flute. And the closer the flute is to the anod, the more effervescent the solution gets (intensity, and thus efficiency, raises).


 A short video:
After a while (30 minutes) I checked the plating. Well, the nickel had already plated some parts of the flute, but not evenly. It was the sign that I hadn't cleaned the instrument enough (the dull color is a regular result, it needs a buffing to get the nickel shiny).

So I cleaned the nose flute more carefully and dipped it again in the electrolyte.
After 2 hours, the job was done. Almost. Indeed, just out of the bath, the nose flute was very dark and dull:
But after a gentle scrubbing with a nail brush with some dishwashing liquid, then a good buffing with a soft polishing clothe, the flute was ready. Oh, the result is not as impressive as a chrome plating would look on a brand new instrument, but as I told before, this german nose flute was so digested by rust that it is more "respectful" of its venerable age not to try to get a super-shiny result.
And here it is, compared to the same german model that has only been cleaned from rust:


... which is a wrong and dull representation. Indeed, in the 1900's, the nose flutes were not oxydized, and even more, whether some were painted, some were nickel or chrome plated. Ditto for the german and british metal ones.


Some of these antique nose flutes still show traces of that plating:

I decided to restore/protect one of my german metal Nasenflöten from rust, the one in the worst shape, very rusty. The goal was not to get a mint nose flute, as if it was brand new: it would be impossible with this technique, since the coat of new metal will be very thin, and all the tin already digested by the rust would not rebuild, for sure. I thought it would be stupid to plate a coat of chrome, since it is so shiny that it would not fit with the damaged flute. With a nickel plating, it would be less shiny, a bit renewed, and protected from rust for years. That would be enough.
First, I removed all the existing rust, by dipping the instrument into a dedicated "rust removal" product (I used "Rustyco").

Then I sanded the flute with very fine steel wool and cleaned it very carefully of any possible remaining "finger grease".
The nickel plating was (and still is) made by electrolysis (electroplating), and is rather easy to do at home. The only precaution is to perfom it outside, not to breathe the gazes. On that purpose, we need one piece of nickel, to be used as an anod, and a nickel sulfate bath (NiSO4 dissolved in water). Plus some usual accessories: a pot, some wire, batteries...
Nickel sulfate:

In my case, I used an already made NiSO4 solution, found in a electronic shop, used for... nickel plating. Warning: if you do it, be sure not to ingest this poison, and avoid to touch it (nickel sulfate is cancerogen by ingestion, but not explosive nor inflamable). The best is to manipulate it outside, with gloves. I also bought a nickel anod, but I could have used any pure nickel item (a real nickel coin, for instance):

First, I build my generator, with 4 regular LR20 batteries, linking in series 2 pairs of them, each pair being connected in parallel. So, I kept a low voltage (2x1.5 V), but doubled the intensity:

I ended the wires with crocodile clips (on the pic, one is covered to avoid contact with the other):

So, I placed the anod in the liquid, used the nose flute as the cathod, and connected them to the batteries.

I first made a test with a copper coin, and a light plating was visible after 30 seconds:

The plating work is much quicker while the piece to be plated is small and the electrolyte is warm. But my nose flute is a rather large piece, I want to work outside (not to inhale gazes) and the weather is very cold. So, my electroplating session will last long. I also will have to change the flute position, and also the crocodile clip location.

Immediately, many small bubbles surround the nose flute. And the closer the flute is to the anod, the more effervescent the solution gets (intensity, and thus efficiency, raises).


 |  |
 A short video:
After a while (30 minutes) I checked the plating. Well, the nickel had already plated some parts of the flute, but not evenly. It was the sign that I hadn't cleaned the instrument enough (the dull color is a regular result, it needs a buffing to get the nickel shiny).

So I cleaned the nose flute more carefully and dipped it again in the electrolyte.
After 2 hours, the job was done. Almost. Indeed, just out of the bath, the nose flute was very dark and dull:
 |  |
 |  |

Subscribe to:
Posts (Atom)